Showing posts with label healing. Show all posts

13 April 2009

Intro to Druid Healing 4: User Interface

This is Part 4 of my Intro to Druid Healing series. The five parts are:

One of the toughest things to learn about healing is how to set up your user interface. Blizzard more or less acknowledges that the default UI is not very good for raid healing, so you're probably going to bring in one or more addons to help you heal. But with that comes the burden of selecting and configuring the tools. It can be a challenging task, and I wanted to share some of my thoughts on how to go about that.

Sections on raid healing:

Good UI Design

Healing an intensive fight can put some real stress on the player. Healers have to react to events more than any other role, and (unless you're dedicated to healing a single tank) you'll be watching multiple toons to see what happens — sometimes a full 25. That's in addition to watching the mob's health, in-game events, adds, void zones and all the other things that everyone has to manage.

Watching so many things at once means you're relying heavily on your user interface. It provides you information and enables you to act. A good UI can make that as easy and natural as possible, but a bad UI can slow you down and make it difficult to heal well.

You will be adjusting your UI. The default Blizzard UI fails for healing raids. Out of the box, you'll only ever see the health of your own group. You can configure it to be a bit better, by dragging the raid health frames into the field, or maybe by turning on the health bars above characters' heads. So you're changing things from the start. Almost every healer ends up making further changes, either through macros or addons.

But before we talk about that, how would we want our UI to work? There's a concept that the US military uses, called the OODA Loop. OODA stands for Observe, Orient, Decide, Act. I believe they use it for strategic thinking, but it applies even to the extremely tactical work of healing.

First you have to observe: what are the mobs doing? Who's taking damage? What are the other healers doing? Orient in this case is about all the background information that informs your healing. What's your role — main tank heals or raid heals? Who's most important to save? What is the boss going to do next? Based on that, you decide what to do: who are you going to heal, and what are you going to cast? (Or maybe you need to move out of that void zone instead!) Finally you act by casting your spells, whether it's a click or a key press. And then? Observe what happens and do it again.

This all happens in tiny loops, of course — as fast as every 1 to 1.5 seconds when healing is intense. But it's good to realize all these components of the process, because your UI can fail you at any one of them. The default UI fails at Observe, because it's difficult to arrange and isn't good at showing you heals, buffs, and debuffs. It also fails at Act, because you have to click on a toon and then either click or keypress to cast a spell. These two actions have to happen sequentially; it doesn't seem like a long time. But you can easily cast 200 spells in a 5 minute boss fight; those fractions of a second can really add up.

Observing

Observing is all about setting up your unit frames so that you have all the information you need. You have to watch a lot of information during a fight:
  • Health and health deficits of all toons, and maybe pets too
  • Who's taking damage
  • Who's got aggro
  • Who's being healed
  • What HOTs do you have running, and how much time do they have
  • Who is cursed or poisoned (or diseased, for non-Druid healers)
  • Who's dead or out of range
Your UI will have to show you all this information, in a way that's clear to understand but also not too complicated. Remember those 1.5 second loops? You don't have time to read hover-text on debuff icons, or to click on a bunch of toons to see who's cursed. Oh, and you'll need to watch the fight, too; you need to know if a Flame Wall is coming or if you're standing in a void zone.

Let me show you what Alamein's UI looks like. I don't claim this is the best way to do it — or even that it's all that great! But it works well for me. (I'll talk later about the addons I use to set this up, but in short, it's Pitbull for the player/target/focus frames, and Grid for the raid frames.)

Here's my full screen UI:

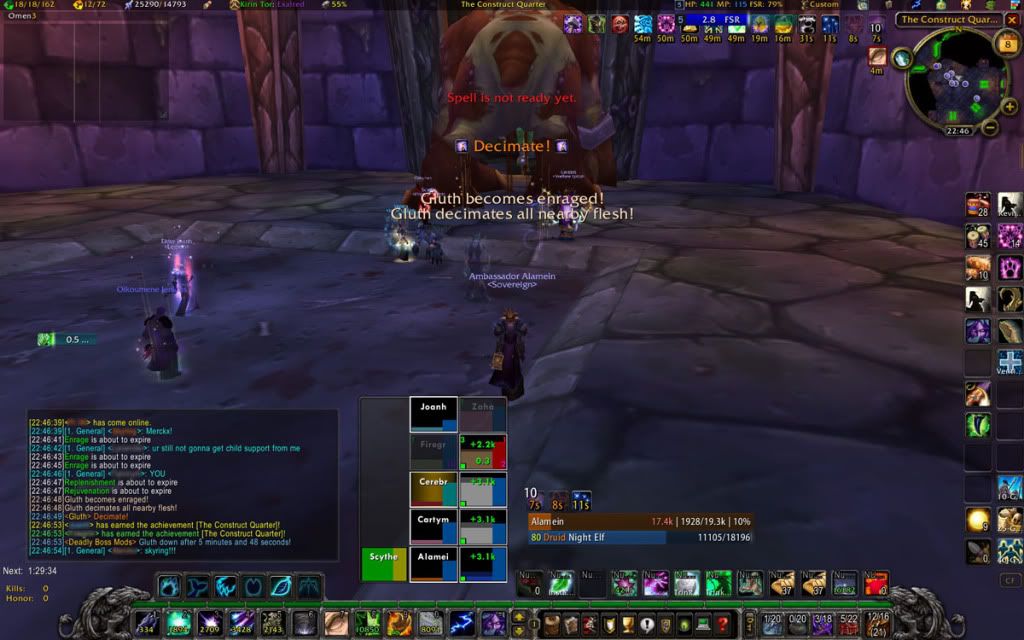
I've moved all my raid frames to the center-bottom of the screen. I could never keep track of my health when it was in the upper-left; this way it's very visible. The down side is that it obscures some parts of the screen.

Here's a closer look at my raid frames:

The goal here is first to get a quick look at the raid: who's hurt? (After Gluth does a Decimate, the answer is: everyone!) You can also see here that Firegrin and Zaha are out of range; that tells me instantly if I need to move to heal them. One thing you don't see here is my aggro indicator; anyone who draws aggro will have a red border around their unit. That way I know who's getting beat on, for instance if the tanks need to trade off each other. Similarly, I'll see an icon and a colored border around any toon that's either poisoned or cursed.

And what about tracking heals? Here's the details of what all those numbers mean:

It's very dense, but it gives me a lot of information in a compact package. I track most HOTs in the corners. The top left shows me the total HOT count, including everyone's HOTs; this way I can see if another healer has left something behind. The other corners count down the time on Wild Growth, Rejuv, and Regrowth (bottom left). Lifebloom, meanwhile, is in the middle; that way I have a clear indicator of when to refresh the stack. (I'm just going to wait and see whether I want to keep this setup after 3.1 lands. Sigh.) I've also able to see incoming heals, so I know whether someone else is healing up a toon.

It's a lot of information in a small space, but it's less confusing than you'd expect. It's very easy, with three corner indicators, to see where your HOTs are. That's especially useful for Wild Growth. Lifebloom is front and center, for now, because I will usually maintain 2 or 3 LB stacks for my tanks. (Soon to end, alas, alas.) And it's all close to the center of my view area; that means my eyes don't have to move much to see the larger environment. Those are all goals to strive for, no matter what addons you use.

Casting Spells

So what about casting spells? There's two pieces to this: who are you casting on, and what are you casting? (If you want to slice it fine, you could split that into Decide and Act.) In the default UI, you select a toon by either clicking on it or on its unit frame. You can use the F1-F5 keys for your party, but that doesn't extend to the whole raid.

You then cast spells either by clicking buttons on your action bar, or by mapping those buttons to keys. There's a lot of ridicule for "clickers", which has some basis behind it; it take a good bit of time to pull your cursor across the screen and get it targeted to a fairly small button. Still, there's a reason that so many players do it; it's simple and direct. With keys, you always have to remember which key maps to which ability. Also, you usually don't have time to look at what key you're pressing, so you have to go by touch. These are skills that you should work to build, because you'll probably find them faster in the long run. Don't be afraid to accept a short-term setback, if it will make things better in the long run.

So what comes after select-and-cast? There are two main styles that you can use: click-cast and mouseover-cast. These are both ways to reduce two separate actions into one smooth motion. They'll both be quicker than select-and-cast. How do they work?

Mouseover-cast removes the click action from the process. Basically, you set up macros for your spells so that they will be cast on whatever target is underneath your cursor. So you just point at what you want to heal and then press the key with the right macro on it.

Click-cast removes the separate key press from the process. It's almost like select-and-cast, but not quite. It uses a combination of mouse clicks and modifier keys to cast spells, choosing the spell based on the modifier key and casting the spell when you click on a toon.

There are advantages and disadvantages to either style, but I think they're both equally viable. I prefer click-cast because it feels most natural to me, and I can combine it with select-and-cast for less common spells. Some people feel that mouseover is more natural, because it relies more on your normal action bars, and it can be done without using any addons. (I don't believe that's true for click-cast.)

Here is the click-cast setup I use:
  • Alt-left click: Lifebloom
  • Ctrl-left click: Rejuvenation
  • Shift-left click: Regrowth
  • Alt+Shift-left click: Wild Growth
  • Shift+Ctrl-left click: Nourish
  • Alt+Ctrl-left click: Swiftmend
  • Alt+Ctrl+Shift-left click: Healing Touch
  • Alt+right click: Remove Curse
  • Ctrl+right click: Abolish Poison
The beauty of this, for me, is that I can cast these 9 spells without moving my hands on the keyboard. I keep three fingers on the modifier keys, so I never have to worry about moving that hand. Then I can cast spells as fast as I can click. I worried it would take a bit of time to learn, but I was surprised how quickly I picked it up. (A single 5-man Heroic run requires hundreds of healing spell casts, which drives learning through massive repetition.)

So that works well for me. I know however that many healers prefer using the mouseover-cast technique; it wouldn't surprise me if it's more popular than click-cast. The biggest advantage is in setup; you can do it all through macros on the standard UI. I suggest you try whichever option sounds more natural to you; try it for a couple weeks, and see how it's working. If it feels awkward, try the other approach.

Choosing Tools

This has been a long debate in the community. What are the best healing tools? I honestly don't think there's a clear winner; the short answer is, the tool that you like is best. I'm not going to spend much time on the analysis, because there's a lot of good stuff already written about it. But here's the short(er) version.

If you want to try mouseover-cast healing, you can do that without addons. You'll start by creating mouseover macros for your healing and cleansing spells. Sydera at World of Matticus has written a great mouseover macro guide that can help you out. You can start out doing that with the vanilla raid frames (or whatever you're currently using) and see how you like it.

I think probably the most common solution is to use Healbot. It provides unit frames, along with a click-cast interface. You could of course turn off the click-cast and use mouseover macros if you prefer. Keeva at Tree Bark Jacket has an excellent review of Healbot that you should check out.

I'm not a Healbot user, so I can't make its case well. I know that a lot of people use it, and the common wisdom seems to be that it's the easiest addon to set up. Personally I didn't find it that simple when I tried it, but your mileage may vary.

The other major raid frame competitor is Grid. It gives you the unit frames, but doesn't have the casting options that Healbot has. (Here's another great Keeva review.) Grid also allows/requires additional addons for specific tasks, such as GridStatusHots, GridStatusLifebloom, and GridIndicatorCornerText. That's even more stuff to set up, but provides for some powerful capabilities.

You can of course use Grid with mouseover macros, but if you prefer click-casting, I recommend Clique as the addon to use. It adds a tab to your spellbook that enables the setup of click-cast mappings.

The most common knock against Grid+Clique is that there are two addons you have to manage instead of one. I see that as a strength; each addon is focused on a specific task. You can read a long and very informed debate about the two approaches on Elitist Jerks in the Resto UI Discussion. My best advice is to try something, see if you're happy, and if not, switch.

At some point I should write up the details of how I configured my UI. In short however I used the techniques described in this EJ post from the Resto UI thread. You should see most of the elements described there in my screencaps above. I also have separate Grid setups for 5/10 man, 25 man, and 40 man setups; you can swap between setups with macros.

Let me know if you want to hear more about my setup, and I can write up an article about that.

Summary

So, there you have it. I feel a bit disappointed that I can't provide the One True UI Answer, but the reality is that there's a lot of good approaches you can use. My best advice is to try something, decide what works and what doesn't, and change based on it.

Your UI can be your best ally or worst enemy for healing. Spend some time on it, and it will reward you.

01 April 2009

Patch 3.1: Speccing Resto and Balance

So, when is 3.1 going to arrive? The current tea leaves are a bit mixed. It feels fairly close, as the PTR builds haven't seen major changes lately. We heard yesterday that Arena Season 5 will end on 14 April, and Noblegarden is currently scheduled to start 12 April (though they will delay it if needed).

The Arena season info is dispositive for me. I can't imagine they'll drop 3.1 on 7 April, with so many talent and balance changes, just for the last week of the arena season. That to me says that 14 April is the most likely date for the patch. That would probably delay Noblegarden by a week, starting it on 19 April. We'll see if that's how it plays out. It's also possible that it will be even later, but Children's Week is supposed to start 1 May, and they're unlikely to overlap the two holidays.

So, we've probably got a couple weeks to get ready for the patch. I've spent a little time on the PTR. I haven't done any raiding there yet, so I don't have a firm opinion yet on how much the regen and Lifebloom changes will hurt. Still, I picked provisional specs for both Resto and Balance, based on talent changes.

Resto in 3.1

Here is the 11/0/60 spec I'm considering:


This is a raid-focused, mana-conservative spec. I'm worried about running out of mana, so I put 4 points into Tranquil Spirit. If mana turns out to be OK, I might steal those points back and put them elsewhere.

One place I didn't put points is into Nature's Grace. I've written about this before, but after reflecting a bit I think its value is a bit less for Resto druids than the previous flat .5 sec savings. To take advantage of the buff, you'll have to react to the NG proc quickly to cast a couple non-instant spells. But we do a lot of healing with instant-cast spells, which don't benefit, and they will use up the 3-sec buff. Also, I believe Nourish won't play nicely with this either, as the faster cast time will just bump up against the GCD. (I need to confirm this on the PTR.)

I put a total of 6 points into Living Seed and Revitalize, even though I'm not completely sure of their utility yet. For now though, I'll take the talents and see how much difference they make. Living Seed I feel better about, as the change to reflect overhealing will really help, and I think Nourish in particular will be a bigger part of our healing. Revitalize is a difficult talent to evaluate, but the addition of Wild Growth should make a big difference. If it goes well, this should actually bring a slight DPS increase to your raid.

If I pulled points out of Tranquil Spirit, Living Seed, or Revitalize, I'd be inclined to put them back into Natural Perfection, Empowered Touch, or possibly Nature's Grace. I would grab Improved Tranquility if I was doing 5-man heroics or PvP, and I'd definitely grab Natural Perfection and Improved Barkskin in a PvP build.

Balance in 3.1

Here is the 68/0/3 spec I'll probably use:


First, note that this is not a pure raiding spec. I expect to use this for a combination of raiding, battleground/Wintergrasp PvP, and solo questing. So I've taken a wide range of talents that won't help much with raiding. This spec will certainly do decent DPS, but if you really want to maximize your raid DPS, you'll need to look at your gear and the other players in your raid. Based on that you can decide whether talents like Improved Faerie Fire are useful.

So based on my desire for versatility, I've taken just about everything in the Balance tree. I took both IFF and Balance of Power, but these might be droppable if either I assume I won't be raiding as DPS, or if I collect enough Hit on my gear. (I should have plenty of hit for Heroics, even without these talents.) On the other hand, Eclipse is only really useable on longer fights, so if I were to stick to PvP and/or soloing, I'd probably shed those 3 points. Owlkin Frenzy is another talent I might sacrifice, particularly if I wasn't concerned with PvP.

If I pulled those points back, I'd put them into the Resto tree. The goal would be to build into Master Shapeshifter via more points in Furor, Improved Mark of the Wild, and Natural Shapeshifter. I'd also look at Intensity if mana is an issue.

So there are a couple provisional specs for 3.1. The big wild card in both specs is mana viability. Some of that can be theorycrafted, but a lot will depend on how the raids play out in both fight design and raid membership (particularly for 10-man). I can't promise that these will be the best specs, but I'm fairly confident that they'll provide a good starting point.

31 March 2009

Offspec Gear

(The UI post is coming along. I'll try to keep it from getting too out of control...)

Over the weekend we ran a heroic Utgarde Keep and the [Sharp-Barbed Leather Belt] dropped. Mattoo (our Bear tank) already had it (or better, I forget) and nobody else could wear it, so they offered it to me for my tanking offset.

Back at the bank, that led to Mattoo and me discussing my tanking gear set. He was interested to see if I could tank sometime, more for the novelty than anything. That's when I mentioned that had a pretty good tanking weapon: the [Staff of the Plague Beast]. That's one of the best Druid tanking weapons in the game. And, as it turns out, it's far better than what Mattoo has. Hm, jealous much? :)

I don't remember the details, but it was a PuG (10-man) and there was nobody around who wanted it. It's the kind of thing that I would never have considered, but the loot master sort of shoved it in my direction. Better than sharding it, at any rate.

The major irony is that it's far better than my current healing weapon. I'm currently rocking the [Gavel of the Brewing Storm]. Now, for a blue rep reward, it's an excellent mace, and I've paired it with the [Handbook of Obscure Remedies] which is darn good too. Still, there are a decent number of drops that are better; I've just not been lucky enough to get them. I haven't seen that many drops to be honest, and I've just lost rolls on those I have seen. At some point, I'll buy the [Titansteel Guardian] if nothing else drops, but for now I'll continue to hope.

But the irony continues. The next night, Mattoo was running a Naxx PuG and whispered that he'd receieved [Noth's Curse] as an offset drop. Well, of course that beats what I'm using; my [Battlemap Hide Helm] isn't bad but it's long overdue for an upgrade. So the irony returns; my tanking staff is better than the tank's, but his healing helm is better than mine.

That's life when you're PuGging raids. Progression is very much at the whim of whatever group you're in at the time. If Mattoo and I were running the same raids together, those pieces would go to the 'right' players. The good news is that I'm not feeling too limited by the gaps in my gear. Overall my stuff is solid, and for the most part I'm able to heal anything I go into. Better gear would help in challenging situations — clueless raids, poorly geared tanks, and so forth — but most of the time it's not an issue.

Still, I'll keep dreaming for a good drop. You know, dreaming [The Impossible Dream]...

23 March 2009

Tree changes in 3.1, as of 23 March

There's lots of changes coming up for Resto Druids in 3.1. It feels like we've been discussing this forever — the base ideas go back 6 weeks or more — while there are new changes coming out all the time. I fully expect more changes (and changes to the changes) before 3.1 goes live. But I wanted to provide a highlight of the changes you'll see.

Affects mana (cost or regen)
Affects healing (throughput, spellpower, debuffs, etc.)

All info is taken from Test Realm Patch Notes unless otherwise noted. The spell links are to the new (PTR/3.1) versions of the spells.

Base changes

Mana regen change: (This applies to all classes.) Spirit: The amount of mana regeneration granted by this stat has been reduced by 40%.

This affects both Innervate and baseline mana regen outside the Five Second Rule (O5SR). The main effect is that both Innervate and pauses in casting will return a lot less mana than they used to. It also raises the relative value of Replenishment — and of Intellect (vs. Spirit) — as a result.

Lifebloom: Mana cost of all ranks doubled. When Lifebloom blooms or is dispelled, it now refunds half the base mana cost of the spell per application of Lifebloom, and the heal effect is multiplied by the number of applications.

This is the biggest direct Druid change. In short, the mana cost of LB is doubled. On the other side, letting it bloom will now refund mana, and both the healing and mana refund of the bloom will stack. So maintaining a LB stack costs lot more but the bloom looks better for both healing and mana efficiency. This will be both a nerf and a significant change to habitual Druid healing techniques, but I don't yet expect to give up on Lifebloom stacks. We'll be discussing this a lot more.

Abolish Poison: Now ticks every 3 seconds, up from every 2. Now lasts 12 seconds, up from 8.

So you have the same number of ticks, spread over a longer time. It'll vary whether this is a buff or a nerf. You'll have longer poison protection, but it will take longer for poisons (especially stacks of poison) to be removed.

Innervate: This spell no longer costs mana.

On live today it costs around 100 mana. This is a trivial buff in any situation except where you're completely OOM.

Talents

Because of all the talent changes — and the dual spec implementation — all players will get a full talent refund. Don't forget to respec!
Tree of Life:Now receives 240% increased armor. You can now use Nature's Grasp and Thorns while within this form. Mana cost reduced to match the cost of Travel Form. Also, may change ToL talent to say reduces the mana cost of all your hots and also lets you go into tree form, which grants bonus healing.(source)

A whole slew of changes to ToL form. The latter clause was discussed on the forums but has not yet been implemented on the PTR. Assuming that change makes it too, then TOL changes as follows:
  • The mana saving on HoTs applies whether or not you're in tree form
  • Can now cast Nature's Grasp and Thorns as a tree
  • Lower mana cost to switch into tree form
  • Improved ToL goes from 100% to 240% bonus armor
These are mostly buffs to tree form in PvP. However, there are times in PvE when it's useful to heal outside of tree form, and this will help with that. Ultimately some decent stuff, but nothing groundshaking.

Improved Regrowth: This talent is renamed Nature’s Bounty. Increases the critical effect chance of your Regrowth and Nourish spells by 5/10/15/20/25%.

This is a big change. It halves the crit chance for Regrowth but buffs the crit chance for Nourish instead. The left hand giveth etc. It was always difficult to make a case for Nourish, mostly because Regrowth was so awesome. So at least this change buffs Nourish while also nerfing Regrowth. It's difficult to plan around healing crits, and there's a good chance that this will contribute to your overhealing. That I believe is the root of the next change.

Living Seed: This talent now accounts for total healing including overhealing.

This should buff Living Seed. I don't yet know how much of a practical buff it will be. Regrowth will crit less often; Nourish will crit more. I suspect that we will be using Nourish in particular a lot more, so this may make Living Seed more worthwhile. Today it does somewhere around 2% of my healing, so that's not quite breakeven for 3 talent points.

Intensity: Now grants 17/33/50% of mana regeneration while casting.

That's a buff in the percentage from the 10/20/30% on live today, but keep in mind that the 30->50% is on base mana regen that's been nerfed by 40%. So in the end it's about where you are today.

Nature's Grace: Redesigned: All spell critical strikes have a 33/66/100% chance to grace you with a Blessing of Nature, increasing your spell casting speed by 20% for 3 seconds. (Note: this is a Balance talent, but it's taken in many Resto builds.)

On Live today, NG will reduce the casting time of your next spell by .5 sec. That is a 33% cast time improvement for Nourish, 25% for Regrowth, or 20%/17% for Healing Touch (depending on talents). This gets somewhat better as you get more Haste. Nourish however suffers because the resulting 1sec cast time will likely be faster than your GCD, so you'll have to wait to cast your next spell anyway. The difference is that you get the buff for 3 seconds, so you can cast multiple spells with it (two Nourishes, for example). The downside is that you're unlikely to react instantly to a NG proc, so you may well miss the first second or two. Ultimately I think this probably works out as a slight buff, but the complexity of the mechanism will make this talent very difficult to employ effectively.

Improved Mark of the Wild: Now also increases all of your total attributes by 1/2%.

A straight buff, though the 2% increase goes only to you and not everyone who receives your MotW. It definitely helps MotW scale as you get more stats from gear. The effect isn't huge, but most Resto druids will take this talent anyway, so it's easy to accept.

Replenish: This talent is now re-named Revitalize and also works with Wild Growth.

This is a buff to Replenish, but is it now worthwhile? The good news is that you'll cast a lot of Wild Growth, so more toons might get the Revitalize buff. The ticks, however, are still both random and rather small. I'd much rather see the random element removed, even if that means making the ticks even smaller.

Improved Barkskin:(New Talent) Increases the damage reduction granted by your Barkskin spell by 5/10%, and increases your resistance to Dispel mechanics by an additional 30/60% while under the effect of Barkskin.

This change is purely for PvP; I can think of very few situations when it will apply in PvE, other than loose adds beating on the healer (which rarely ends well in any case). As a 2-point talent in the 10th tier, it is designed to give Druids some additional incentives to go deep Resto for PvP.

Glyphs


Glyph of Nourish: Your Nourish heals an additional 6% for each of your heal-over-time effects present on the target.

A nice little boost to Nourish, further suggesting that it will be a much stronger heal in 3.1, particularly for tank healing. With 3 HoTs up on the target, that's an additional 18% bonus to Nourish. Add in the increased crit chance, and you'll see some whopping big heals from our "Flash Heal" equivalent.

Glyph of Wild Growth Wild Growth now affects up to 6 targets.

A simple change, but one that could add an additional 20% to the healing capacity of Wild Growth. The only problem now is how many worthwhile glyphs we have available. I'm unlikely to take this — I'll probably go with Swiftmend, Lifebloom, and maybe Nourish. But if you do a lot of raid healing, this could be a major buff.

OK; I think that's the lot for now. I really should do a post on the Balance changes, if I can get to it. Those are a bit less extreme but still significant.

20 March 2009

Intro to Druid Healing 3: Raid Healing

This is Part 3 of my Intro to Druid Healing series. The five parts are:

Raid healing at its base level is pretty simple: keep the healers and DPS from dying. Because a lot of raid damage is avoidable, you'll often see the newest or least-geared healers given the raid healing role. But even more than tank healing, your raid healing can really benefit from skill, organization, and insight. This article is designed to get you started with building all three.

My apologies; this article is really long! (Took a long time to write, too.) I hope you'll find the information useful. I welcome feedback in comments.

Sections on raid healing:

Assignments

So, you'll be healing in a raid today. There are a few basic factors that you'll want to know before you get started. First, what is your assignment? In 10-man raids the assignments can be fairly blurry, and there's a good chance you'll be both tank healing and raid healing. In a 25-man you're more likely to have a specific role, even possibly to healing a specific group or role (e.g. melee DPS) in the raid. Even tank healers may need to do some raid healing from time to time, but if you have dedicated raid healers, you'll generally let them deal first with damage.

Related to healing assignments is heal sniping: the practice of people stepping outside their healing assignments. This can be a problem for a couple reasons. First, you don't want people to lose focus on their main job. If the tank dies while her healer is messing about with raid heals, that's pretty bad. Second, you lose time and mana when two healers heal the same raid member. Healing assignments are designed to help prevent this.

That said, heal sniping isn't all that big a deal in most situations, and in some it's crucial. (I talked about this last week.) If the encounter is easy and healers are bored, they're going to find other things to do. And if things are getting really tough, healers need to help each other out. That goes both ways: tank healers can help out on bad raid damage, while raid healers can lend a hand when the tank is getting creamed.

I think heal sniping gets blown out of proportion because people worry too much about the healing meters. Frankly, they're an OK tool, but they don't tell you a lot. The real measure of success is whether you beat the fight. If your raid leaders are judging healers by ranks on the healing meter... well, they need to understand a lot more about how healing works. I think I'll write more about healing meters in the Special Considerations post.

Beyond your healing assignment, don't forget to remove debuffs — curses and poisons, for a Druid.

Understanding your raid

It's crucial to know about your raid. One dimension of that is understanding the fights you'll be taking on. How much raid damage will you see? Is it avoidable or not? Will there be burst damage or does it come at a steady pace? This obviously will vary from boss to boss and between different kinds of trash mobs.

An important piece of that is understanding the debuffs you'll face. Sometimes they're just annoying, but other times they're critical, like the Necrotic Poison cast by Maexxna or the Curse of the Plaguebringer cast by Noth.

The other dimension is understanding the members of your raid. That starts with knowing your other healers. That starts with understanding the classes (and specs; Holy and Discipline priests are very different). Knowing the key spells of your partners helps you understand what they're doing. Beyond classes, know the players. Are they aggressive or slow to react? Do they suffer from lag or get disconnected? Do they stick solely to their assignments or help out? Are they good at removing poisons and curses? (And diseases — Druids can't remove them, but you might have to heal through the damage if your partners miss it.)

Finally, know your players in general. Are they quick to move out of the fire, or away from the bosses' Whirlwind? Do they use health stones and healing potions? Are the offtanks good at quickly picking up adds? Is the hunter quick to Feign Death when she pulls aggro? Does the warlock Life Tap a little too aggressively? Who's higher on DPS (and needed to beat the enrage timer)?

Knowing the other players you run with can be a huge factor. It's the biggest reason why PUGs are so hard. So if you're running with a guild or regular group, pay a lot of attention to your players, and you'll get a big advantage from it. And if you're in a PUG, learn as much as you can as you go along. (Hint: your damage meter is a better tool for healing a PUG than your healing meter.)

Types of raid damage

So you just saw one or more health bars drop, and you need to do some healing. It's good to be aware of both what just happened and what's happening next. In the end it's all just damage, but knowing the story helps you choose the right spells to use. The variation is huge but there are a few differentiators you can consider.

Who got hit are hit? Sometimes it's just one, say, due to a random mob attack or someone who stood in the fire. If it's just one toon then you can focus on fixing the single problem. But if a lot of toons are hit, you'll need to either spread out your heals, or (in desperate situations) prioritize who gets the heals.

How much damage is there? If someone is hit hard, you're going to need to tee up some bigger heals to deal with it. You'll also have to heal quicker in order to keep the toon alive. On the other hand, if it's less damage, you can afford to use slower-working, more efficient HoTs.

Is the damage one-time or ongoing? If the toon isn't going to get another hit soon, you can afford to let a HoT tick to heal them. But if they're going to get hit again soon, you might have to do something more direct. A special case of this is when a DPS or healer has pulled aggro. Hopefully this is not from a boss (!) but it's fairly common with trash (especially AoE trash) or adds that arrive during a fight. Here it's crucial to watch when the toon loses aggro.

What to cast

This is what you really want to hear, isn't it? What should I be casting? Well, let's make a few assumptions first. Let's assume that you're healing within your assignment, so you can't expect someone else to jump in. (This is the target of my stomping heals post from last week.)

As of today — before the 3.1 patch — you should really read my raid heals post. It describes some initial details about how much each spell can heal and when they're best used. It provides a good bit of analysis that I'm not going to address here. (I will eventually write a new post when the effects of 3.1 are set in stone, or at least curing concrete.)

OK, are you back? Here's the upshot of all that analysis.

Spam Wild Growth. You'll be using Wild Growth for a huge chunk of your raid healing. The only reasons not to use it are when only one toon has taken damage, or when someone is so gravely wounded that you need a big heal Right Now.

You can do some things to get the most out of Wild Growth. Keep in mind that it's a smart heal. So when you cast it on a toon, WG will hit the 5 toons within its range that need it most. (Note, this might not include the person you cast it on!) This is where knowing the nature of the damage helps. If it's geographically localized — say, the melee are hit by a Whirlwind — make sure you cast it on someone from that group. In extreme cases when the raid is highly spread out, you might not even be able to hit 5 toons with the same WG.

It's also worth noting that WG doesn't know about healing assignments. So maybe you're assigned to Group 4 or whatever, but WG will hit anyone. That's true of a lot of other spells too, so don't fret over it too much. Try to make sure however that you're at least hitting part of your assigned coverage.

So use WG when you can. But sometimes it's not enough, and even when it's good you'll have it on cooldown a lot. What do you do then?

Light raid damage: If the toons aren't hurt too badly (and if you're not using WG) your best bet is to use HoTs, most probably Rejuvenation. The other alternative is Lifebloom. Rejuv does more healing and also sets up a Swiftmend if necessary. On the other hand, LB delivers its initial healing faster (Rejuv doesn't tick for 3 seconds) and (before the 3.1 patch) has a slightly lower mana cost. Either one is pretty good if the toon doesn't have a ton of damage and can wait for his heals to add up. You can also spread around a combination of Rejuvs and LBs (plus WG of course) to top off a slightly bigger chunk of damage.

Heavier damage: This is the situation when someone's taken a bit hit and needs an urgent heal. Your goal is to get their health bar up quickly — maybe not to 100%, but at least enough so they won't be killed on the next hit.

The first choice here in many situations is the combination of Rejuv followed by Swiftmend. This sends a big heal within one GCD, and (if glyphed) leaves a Rejuv behind to top off the toon. Many Druid healers don't use Swiftmend enough — I know I don't! It's great for this kind of thing.

So Swiftmend is great, but often it's on cooldown. It's amazing how long 15 sec can be, especially if the whole raid is getting hit fairly hard. If the toon is badly wounded, probably your next option is to cast Regrowth. It gives you both a big direct heal as well as a useful HoT.

Nourish is your other option. Today (as of 3.0.9), I think Regrowth should usually be your first direct heal. Use Nourish as your first step in two cases. For one, if you already have another HoT on the toon, then Nourish will get the 20% boost that makes it more useful. The other situation is when the toon is gravely wounded (say, down to 5% or less health) and/or is taking damage rapidly. Then you might spam Nourish to get some very quick health back onto the toon.

The other big use for Nourish is as an additional spammable heal to get a toon back to full health. With the Regrowth HoT active, Nourish gets a 20% boost, and it's faster to cast than Regrowth. So if you still need to heal after your first Regrowth, consider switching to Nourish.

Nourish is really going to change in 3.1, so I expect this evaluation to shift. I don't have a full analysis now, but I'll provide more (and update this article) when we've learned more (and when 3.1 is in a more stable state). In short, however, Nourish will probably be better and Regrowth a little worse, so you'll want to use Nourish some more.

Finally, I want to mention the Nature's Swiftness + Healing Touch combo, especially if you have a macro to put them together. It will arrive faster and heal more than any other heal. The problem is the 3 minute cooldown; often you will either have it unavailable, or you'll be saving it for a 'real' emergency. Don't be afraid to use it; 3 minutes isn't that bad, and you might well get a couple uses from it within a single boss fight. Just be ready when it's not available.

Prioritization

Sometimes, you'll have more raid damage than you can deal with. This is where my earlier discussion of triage comes in. You have to know who to heal first, and who to ignore.

The toughest question is when to give up (on a toon, not the whole raid!). Sometimes the damage is too high for you to heal through. This is most common when a toon pulls boss aggro. If the toon is likely to die even with your heals, you don't want to waste the time and mana spent healing him. This is rarely an option for the tanks, but it's a common consideration for DPS and sometimes healers.

If you're forced to choose between two injured toons, it helps to know who does more for the raid. Many boss fights with enrage timers will test your DPS; if two toons are close to death, you'll want to save the one with higher DPS. You'll often have to prioritize healers above DPS, but in some cases the DPS is more important; this will depend on the fight. Class can matter here too; save the Moonkin, and maybe she can use her Rebirth. On the other hand, maybe that Shaman can use Reincarnation to rez himself if he dies. (Or maybe it's on cooldown — don't assume that Shaman will be happy if you let him die!)

However, you should almost always make sure to heal yourself. This comes from the principle that you can't do any healing when you're dead! The only exception is a desperate attempt to keep the tank alive. Also, if someone else is designated to heal you, you may have to trust them to take care of you. In general though, you need to be aware of your own health and the damage you're taking.

Summary

OK, wow. That's a lot of stuff! Really this is all designed to help you make good choices. Knowing that stuff will help you do much better raid healing. But if you're in doubt, a good outline of raid healing looks like this:
  • Know your assignment and make sure you cover it. But help out others if you can.
  • Use Wild Growth a lot.
  • Use Rejuvenation and Lifebloom to heal mildly wounded toons.
  • Use Rejuv + Swiftmend if someone's hurt badly.
  • After that, use Regrowth and/or Nourish to save the gravely wounded.
  • Remember Nature's Swiftness + Healing Touch for real emergencies.
And a final note: this is my own personal guide to raid healing. I think you can use this and it will serve you well. But there are many other techniques that players use, most of them quite effective. Options like a glyphed/talented Healing Touch can radically change your playstyle, and I don't mean to rule that out. But if you're looking for a good place to start, hopefully this will help you out.

Two more pieces on Intro to Druid Healing are still to come. Now that this is out of the way, I think the others should be relatively easy. Knock wood!

13 March 2009

T8 set bonuses

I know Lifebloom, regen changes, and dual specs have occupied my attention with patch 3.1. But there's a ton of other stuff going on and some is very interesting. I saw the T8 set bonuses today on MMO-Champion and they're pretty sweet.

DISCLAIMER: All subject to change of course! So don't assume this stuff will really happen. But it's cool enough to think about anyway.

Tier 8 of course will be the new sets that come from Heroic Ulduar. They have an iLvl of 226, compared to 213 for heroic Naxx/OS and normal Ulduar, or 200 for normal Naxx/OS. But the set bonuses are exciting:

T8 Feral Druid

2 pieces: The periodic damage dealt by your Rake, Rip, and Lacerate abilites has a chance to cause you to enter a Clearcasting state.
4 pieces: Increases the duration of Savage Roar and Survival Instinct by 8 sec.
I don't know feral well enough to give a full analysis here. But the Clearcasting proc seems like it could be fairly powerful, depending on how often it procs. Free abilities are pretty cool. The 4pc duration increase isn't sexy but it has punch. For Savage Roar, it depends on how long a combo point cycle takes. If it allows you one more 5-pt finishing move before you have to reapply Savage Roar, that will be a sizeable buff for cats. For bears, adding 40% duration to Survival Instinct sounds like a big enhancement for a major panic button.

T8 Balance Druid
2 pieces: Increases the bonus granted by Eclipse for Starfire and Wrath by 6%.
4 pieces: Each time your Insect Swarm deals damage, you have a chance to make your next Starfire cast within until cancelled instant.
As of WotLK, a big question for Moonkin is how to manage your Eclipse procs. Do it well, and your DPS goes way up. The 2pc bonus really rewards skilled Moonkin with a 6% buff to the talent, which is great. The 4pc bonus could really multiply that even further, depending on the proc chance. If you get a few instant-cast Starfires in your rotation, that's huge. If you can work in 1-2 extra instant Starfires while under Eclipse, that's immense. It also sounds like a fun mechanic to work with. I hope it has a distinctive sound and/or a nice visual effect when it procs.

T8 Restoration Druid
2 pieces: Increases the healing done by your Swiftmend spell by 10%.
4 pieces: Your Rejuvenation spell also instantly heals your target for its periodic healing amount.
The 2pc bonus here is both boring and useful. I have to admit that I'm not great at using Swiftmend, and I need to do more to work it into my rotation. But it's a great spell, and buffing it by a straight 10% is fairly big. Now, the 4pc bonus is slightly vague to me, but it really sounds like it gives Rejuv an instant heal in addition to its HoT component. Really? Because that would be amazing! If Rejuv becomes an instant-cast mini-Regrowth, then you've got a damn powerful tool at your hands. It could be useful for tank healing, but it would make Rejuv the hands-down best option for raid healing, no question.

Edit: Tree Bark Jacket confirms this as an instant heal for a single tick of Rejuv. That makes a lot of sense but not a "mini-Regrowth". That's still a fairly powerful ability however; Rejuv ticks are sizeable and usually the first one is 3s away.

The only thing depressing about these set bonuses is how difficult they'll be to acquire. I haven't looked yet but it's clear that some tokens are going to drop from some difficult bosses. So, getting to your 4 piece bonus won't be trivial. Of course you want great gear to be hard to get, there's nothing wrong with that. But some of these bonuses — Resto, in particular — can really change the way you play. It seems odd to give game-changing abilities to such a small percentage of Druids.

11 March 2009

First Lifebloom thoughts: thanks Keeva!

Only time for a quick post today — my apologies!

I've been giving a lot of thought to Lifebloom and the potential changes. I haven't come to any conclusions yet, though I'm closing in on them. However I wanted to quickly call your attention to a great Lifebloom thoughts post at Tree Bark Jacket. She's thinking in the same direction as me.

In a nutshell, I'm fairly confident that I'll still be rolling LB on at least one tank. I'm not sure about two, and three is probably out except for special circumstances. But I think that has the potential to make healing assignments easier.

Today (in 3.0.9) a significant Druid role is to roll HoTs on multiple tanks.* In 3.1 I can imagine that we'll focus more on single-tank healing. We'll limit ourselves to a single Lifebloom stack, but our newly-buffed Nourish will be used regularly to fill the gaps that our HoTs leave behind. Plus, if we're focused on one tank, we can reliably decide to let LB bloom when it's useful. And we should have the same capacity for raid heals as we've had before; potentially more, if you're able to effectively use Lifebloom for raid heals.

The only mild disagreement I have with Keeva is her description of our role as support healers. I know what she's trying to say, and there's truth to it. But I disagree with the implication that other healers are primary and that we're there to help them out. You could just as easily say that our HoTs, for tank healing, are the foundation. They certainly do a big chunk of the effective healing! Another healer working on the same tank is more likely to support us than the other way around.

That's just a quibble however, and I very much support what Keeva says overall. Thanks for a great post!

*There's lots of ways for Druids to heal, and I know many don't use Lifebloom much even today. More so than most specs, Druid healers have multiple viable approaches to healing. But I think multiple LB stacks is still one of the most common techniques.

10 March 2009

Stomping on each other's heals

Raid healing. That post is coming Soon. No really!

Before I take that topic on, though, I want to explain one common raid healing issue that I'm not going to discuss. That's the issue of different healers sending heals to the same raid target — and specifically, which heals are better at stopping it.

Heal crowding like this is something you don't want. Most raid damage is low enough that one heal can take care of it. When two or three healers are healing the same (non-tank) toon, it wastes both mana and time. I know that mana in particular is rarely a concern now, but all evidence says that this will change with 3.1. Better to learn good habits now.

Heal crowding is a particular problem for Druids. Healers all react to a low health bar. If every healer sees the same bar, they'll instinctively want to deal with it. Most druid heals are instant cast HoTs, right? So a Druid can react quickly, but his heals won't be effective for several seconds. Meanwhile, a Priest or Paladin will start up a short cast time heal, which will arrive after the HoT but before it ticks much. Group heal spells like Wild Growth, Circle of Healing, and Chain Heal also contribute to the problem, especially because the caster can't predetermine who they will hit.

Now, truth is, many healers are having an easy enough time at this point that it's not worth the effort, and we just stomp on each others' heals without thinking too much about it. It's also part of the alternative game "who can top the healing meters?" But if (when) you find yourself tackling some challenging encounter, you'll have better chances of success if you're cooperating with other healers, rather than competing.

It's a legitimate issue and one that raids should work to avoid. But what I don't want to get into is analyzing Druid heals based on which ones are most likely to avoid the problem. Because, in a nutshell, the problem isn't the heals, it's the healers. If your raid heals are getting stomped on, the answer isn't to change what you're casting, it's to work with your healers to coordinate better.

I've read a lot of analysis of raid heals that comes down to, for instance, "Regrowth is better than Rejuvenation because other healers will heal over my Rejuv, which wastes it." For me, that analysis is both true and misleading. Sure, a direct heal may be more obvious to other healers (the toon's health bar goes up). But the HoT is probably both more efficient and faster to cast. Or, possibly, the other healer's spell is more appropriate to the situation.

There are a few things you can do to avoid the problem. First, work out healing assignments and know who's supposed to be doing what. Second, know your other healers — both the classes and the people playing them. Know what they're good at, what spells they cast, how they'll react (and how fast). And then hold back on that HoT if someone else will be healing the same toon.

Doing that won't help you win the healing meters. But it will help you beat the encounters.

18 February 2009

"I don't get the regen nerfs"

No time for a long post today. Thanks for the great response to the two intro healing posts; I have good plans for part 3.

There is a great thread ongoing on the official forums about the incoming nerfs to mana regen (through the five second rule) and how that relates to healing overall. For reference, here is the overall thread and here is the BlueTracker which highlights the Ghostcrawler (Blizzard developer) responses.

I don't have a complete response to this, and it's an ongoing discussion anyway. But I wanted to call out a few interesting points.

We actually want for healing to be less spammy and more about decisions and coordination. But if we did that sans other changes, everyone would be out of fsr even more and the content would be too easy. Make sense? Making regen more consistent is also the key to making healing more tactical and less monotonous and frenetic.
This really helps understand what they're striving for in 3.1, but I think it elides a significant point. 5SR regen doesn't directly make the content too easy, it makes regen too easy. That in turn means there's no penalty to spamming heals, so that becomes the right strategy to beating the content, and your best strategy is to cast your biggest heals as fast as possible.
Sunwell and similar content were tuned to where you couldn't realistically stop casting for regen anyway. If you are stopping now, it's because Naxxramas is easy. On challenging content, all 4 classes already spammed heals pretty consistently. That meant the out of FSR breaks came mostly from clearcasting procs or encounter mechanics that forced you to pause. When that happened, mana felt limitless. As I've said, we would rather shift back a little (A LITTLE) from GCD-constrained healing to mana-constrained healing.
This helps clarify the intent even further. In my IDH Base Concepts post, I intentionally put GCD before mana. GCD-limited healing is by far the biggest concern — today. The goal for 3.1 is that you're weighing it more against mana management.

The tough part is that in that kind of design, if your raid is undergeared or handling the encounter badly, you'll find yourself spamming heals to survive and then wiping when the healers go OOM. That will feel weird, and we'll need to adapt.
This change won't change the relative values of Int and Spirit. Int was already a good regen stat (in part because it provides other bonuses). However, you are rarely ever choosing between a +100 Int chest and a +100 Spirit chest (though you might be with gems). More to the point though, the regen formula is SQRT of Int * Spirit * a constant. We are just lowering the constant. If Spirit was good for you before, it will still be good for you.
This is really only partially right. Spirit gets hit harder because it no regen value outside this equation, while Int also builds up your mana pool (and adds Crit besides, which procs some mana-saving talents). So if you're going OOM, you'll first stack Int and MP5. Spirit will still be a Spellpower stat for Druids (Improved ToL) and (I think) Priests, so that should help mitigate a bit.
If you mean these changes will nerf Innervate, yes, it will. On live Innervate can be 120% of your bar, say 25,000 mana. Historically it was more like 75% of your bar, and it should be closer to that with these changes.
Pretty clear answer. This will feel like a nerf, for sure. It will definitely affect your choice to pop Innervate. Right now, I wait until I'm just about OOM... and even then it's a license to spam (even more) for a few seconds.
The problem is simply, the 5sr adds too much variance into your regen that non-spirit classes don't deal with. Blizzard wants to make fights that challenge your mana pool, but they have to be able to model what your mana pool should look like over the course of the encounter. When luck based factors can greatly affect that, there's no way to model it.
(Not a blue post, but endorsed by Ghostcrawler.) This is very good at explaining the motivation behind the change, and it clarifies how the developers got from point A (want more interesting fights/less spammy healing) to point B (nerf the 5SR regen). That linkage was unclear before.

The right conclusion is that yes, this will have a big impact on how we approach healing. At first it will be less obvious when you undergear the content — you can keep everyone alive, after all... until you go OOM. You'll feel like you just need more potions/Replenishment/Innervate/faster DPS. Adjusting to that mindset will be a challenge. It probably means some low-intensity long-duration fights. It also means a lot more attention to healing assignments (overheal is now a lot more painful) and the mana efficiency of heals (do more with less).

I'm still not completely settled into an opinion on how well this will work. We'll have to see what happens first on the PTR. In the meantime, my advice is twofold. First, don't make major adjustments to your gear choices, but you might start backing off just a hair on Spirit. Second, chill out. More changes will come, so there's no point to getting mad at this yet. At the least, save your nerdrage until you see problems on the PTR.

16 February 2009

Intro to Druid Healing 2: Tank Healing

This is Part 2 of my Intro to Druid Healing series. The five parts are:

Tank healing is the closest thing we get to a rotation. Your tanks should take, depending on the encounter, somewhere between 70% to 100% of the overall incoming damage. That's... the definition of a tank, I guess: he takes the damage, so you don't have to.

Sections on tank healing:

Know Your Tanks

This all starts with knowing who are the tanks. In a 5-man instance, that's usually pretty easy. (Though it can be confusing sometimes. I ran heroic Gundrak over the weekend with four Death Knights. Honestly, I'm not even certain which talents separate a tank-spec DK from DPS.) In a 10-man raid, it's a bit more confusing. You'll usually have a main tank (MT) and an off-tank (OT). 25-man raids will likely have 2 or more off-tanks.

On trash fights, you'll typically see the MT and OTs splitting up the mobs, unless the trash is pretty easy. Usually this plays out as one tank grabbing initial aggro, then the other will peel off some of the mobs onto himself. Be ready for this.

On boss fights, the MT is defined as the player who's tanking the boss. That often but not always means he'll be taking the most damage. The OTs usually have the job of grabbing aggro from "adds", the additional mobs that show up as part of many fights. Another common OT task is to grab and hold the boss when the MT can't; the Archavon fight in Wintergrasp is an example.

Be aware too that the MT and OT may change roles at different times due to class differences, skills, or gear. For example, in our guild our feral Druid is usually the MT, but in the Military Wing in Naxxramas our Paladin usually switches to MT, as Paladins have special tools against the undead that populate that wing. (I might eventually post an advanced topic about each tank class's special abilities and how they affect healing.)

The Foundation

Your HoTs (Heal Over Time spells) will form the base that do most of your tank-healing work. I'm talking about two spells: Lifebloom and Rejuvenation. On some fights, they'll be all you need.

Lifebloom (LB)

Lifebloom is the defining spell for Druid healers. It's also the centerpiece of your tank healing.

LB is a great tank healing spell because it's fairly powerful, ticks every second, and is mana efficient. On your tanks, you'll want to keep up a stack of 3 Lifeblooms, without letting them bloom. You should be able to keep a Lifebloom stack rolling on up to 3 tanks without too much trouble, depending on spec and glyphs. (Practice this if you need to.)

Don't let the stack expire. Your mana efficiency and healing throughput take a big hit if you have to rebuild the stack. The key here is timing your refresh cast: earlier hurts your mana efficiency, but too late and you'll lose the stack. (Lag can hurt you here too.) I usually shoot for about 1s left, or 2s if I'm being careful.

Rejuvenation (Rejuv)

Rejuv is a nice complement to Lifebloom. It ticks every 3 seconds but its ticks are fairly big. Another reason to keep Rejuv up: you can Swiftmend off it when needed.

Rejuv is unlike Lifebloom: you want to let it expire before you re-cast it. That's because it only ticks 7 times. If you re-cast it before it hits 0, you'll lose that last tick - almost 15% of its healing power (and mana efficiency). Remember, if you're looking at a timer, "0" usually means "less than 1 sec" and not "expired".

(Regrowth can bridge the gap between your foundation and spike damage. More on that in the next section.)

So for basic tank healing, keep Rejuv and a full stack of Lifebloom up at all times. Do this, and you've done 75% of your tank healing. But the other 25% comes at really important moments — when your tank is in a bit of trouble.

Spike Damage


When your foundation starts falling behind, you need to get caught up. We have a few heals in our arsenal that do this. The three most important are Swiftmend, Nourish, and Regrowth. Unlike the foundation, these are more of a choice: what's appropriate for the situation? They each have strengths and weaknesses.

Regrowth

This is an amazing spell, and you'll use it a lot. It is your biggest quick-cast catch-up heal, especially with its high chance to crit. So it's a good spell for when the tank has a sizeable health deficit. But it also leaves its HoT behind, so it's useful as an additional piece of your healing foundation. Its biggest weakness is that it has a fairly high mana cost. Use it when your basic HoTs are losing ground, or when the tank is less than 50% health.

Swiftmend (SM)

Swiftmend is a great spell: instant cast, decent healing throughput, decent mana efficiency. It requires an existing Rejuv or Regrowth on the target; that's why you'll always have Rejuv up — right? Its biggest weakness is the 15s cooldown. That does limit its use, but don't be shy: use this as often as possible.

The Glyph of Swiftmend is almost mandatory — it stops the Swiftmend from consuming your HoT. Basically, it saves you a GCD every time you cast Swiftmend. Highly recommended.

Nourish

Nourish is a pretty good spell, though most Druids are having a tough time deciding when to use it. It's quicker than Regrowth and uses less mana. But since many Druids have more mana than they can use, there's little motivation to be efficient.

My current recommendation is to use Nourish if the tank is between 75% and 50% health, and if Swiftmend is on cooldown. I expect however that Nourish will get buffed, probably through an added glyph, and that Regrowth might see a bit of a nerf. Watch for developments in this area.

Panic Buttons


When the tank gets below 25% or so health, you need to start reaching for heroic measures to keep him alive. Druids are a bit lower on panic buttons than many other healers, but use what you've got.

Start by hitting your Swiftmend if it's not on cooldown.

Your big panic button is the combination of Nature's Swiftness (NS) with Healing Touch (HT). This gets you an instant cast HT, which hits big and can crit for even more. This can restore 25% or more health on even a well-geared tank. It's on a 3 minute cooldown, so you get maybe one or at most two of these per fight. Put these into a macro for best use.

If Swiftmend and NS+HT are on cooldown, your best bet is a combination of Regrowth and Nourish. Nourish will hit faster, so use it if the tank is really low. Beyond that, the key variable is whether you have the Glyph of Regrowth. Without it, Nourish is more efficient and about the same at healing throughput. With the glyph, Regrowth is about as efficient and a lot more powerful. See Phaelia's Direct Heal analysis for the details — but expect this to change with later patches.

Finally, there's Tranquility. This is a wonderful spell in 5-man instances; it can keep the whole party from death — not just the tank. It can be pretty good in raids, too — if you're grouped with the tank(s). Just remember that it has a 30-yard range, so you need to get at least a little bit close. If you're taking damage, you'll need to pop Barkskin to prevent Tranq clipping.

Other Considerations


One of the biggest things you can do to improve as a healer is to anticipate the fight. Make sure your HoTs are refreshed before stuns, if you know when they're coming. If an aggro switch is on its way, start stacking HoTs on the next tank. This kind of anticipation is what distinguishes the really good healers.

Be ready to use Abolish Poison and Remove Curse when necessary. It helps a lot if you know what kind of curses or poisons you're dealing with. Many are actually not that painful, and you can either delay cleansing them or just heal through them. But some are deadly. One example is Maexxna's Necrotic Poison. It reduces healing received by 90%, so you're basically locked out of healing your tank until you get rid of this.

Finally: practice. This is the most repeatable part of your healing job, and the piece that will benefit the most from refinement and repetition. Practice will help you time your HoT refreshes better and will help your reaction time to damage spikes. Polishing your tank-healing skills will really help you shine as a healer.

Summary

  • Know who your tanks are.
  • Start tanks with a base stack of 3 x Lifebloom and a Rejuvenation.
  • Spike damage: Use Swiftmend when it's available, Regrowth, or Nourish.
  • Also use Regrowth for its extra HoT.
  • Panic buttons: Swiftmend and/or your NS+HT macro.
  • Remove curses and poisons, especially the worst ones.
  • Know the fights and what the mobs will do.
Next up: raid healing. That should be interesting!

12 February 2009

Intro to Druid Healing 1: Base Concepts

I see a lot of referrals that come from people searching for "druid healing rotation" or something similar. Think of this post series as "Intro to Druid Healing" — it's first-semester calculus, but designed for math and physics majors and not liberal arts. You'll go on to bigger and better things, but this should give you a good foundation.

The intro-level course will span five posts:

So, on to DH1: Base Concepts

Like I mentioned, everyone wants to know a healing rotation. The secret? There is no healing rotation, Neo. Healing is, more than any other WoW role, fundamentally about reacting to what's happening. A plan is good, but you have to be willing to toss it out when the situation changes.

I could just tell you what spells to cast. But you probably know that already. (And if you don't I'll get to that in later posts.) The key to good healing is to make smart decisions. These base concepts will provide the foundation for those good decisions.

There are four basic concepts I want to talk about in this post:

GCD Management

Global Cooldown (GCD): A global or universal cooldown, frequently shortened to "GCD", is the cooldown which starts every time you start to cast a spell, and it affects all of your class spells. (from WoWWiki)
The number one thing that will make you a better healer is GCD management. One obvious part of that is knowing how to cast spells as fast as possible; that's just a matter of timing your casts to the GCD. But GCD also represents a choice. You only have so many chances to cast a spell. GCD limits that for every class to some extent. But as Druids, four of our main healing spells are instant cast, and a couple more have cast times either sometimes (Regrowth) or always (Nourish) about equal to the GCD.

So GCD management means making the most of your limited chances to cast heals. It's a matter of opportunity cost: spell X will do the most good at this particular time. There are many ways this shows up:
  • If you cast a heal on a target that dies, that's a wasted GCD.
  • If you let your Lifebloom stack expire, you'll have to spend 3 GCDs building it again. That's two lost GCDs.
  • If you forget, and (accidently) cast a Rejuv on a target that has several seconds left on its existing Rejuv, that's a lost GCD too.
Each of those lost GCDs is a lost healing spell. That doesn't matter on easy, boring, casual fights. But it makes all the difference on challenging fights.

Mana Management

If GCD provides the time-bound healing constraint, mana is the resource-bound constraint. Cast too many spells, or too many inefficient spells, and you'll run out of mana.

You'll see a lot of recent references that state "I never run out of mana" or "mana regeneration is currently too powerful, especially for healers." This is both true and false. There's a real problem here for moderate- to well-geared healers, particularly in larger raids. But a newer healer in green-to-blue gear will very likely have mana issues, particularly in a group or raid that doesn't bring the Replenishment buff.

Moreover, mana regeneration is going to change. You will have to manage your mana at some point. I'm not going to analyze the specifics, mostly because I expect them to change at least a little bit. Point is, it's a good habit to be aware of mana efficiency, and to practice managing your mana. Otherwise you'll find the boss at 30% health and you OOM with no remaining options.

There are three basic things to look for:
  1. What is the mana cost of your spells? In particular, what is their Heal per Mana (HPM) amount? This is basically a measurement of your spells' efficiency.
  2. What is the size of your mana pool? How much mana do you start with?
  3. What is your mana regen? Broadly speaking, this is the rate your mana bar refills. This is a whole topic itself, and there are a host of factors that affect it.
We'll talk about mana management throughout the guide. But it's also important to remember that mana management is secondary to healing. Or to put it differently, a mostly-full mana bar does you no good if you're dead. So you do your best to manage mana well, until an emergency hits and you have to toss heals like confetti. That's why good GCD management results in good mana management: you have fewer emergencies.

Gear Levels

I've talked about judging healer gear in this post and this post. I won't repeat that material; it gives some background on what stats you need and why.

The only thing I'll add is the concept of throughput versus sustainability. Throughput basically means how powerful your heals are, while sustainability talks about how long you can keep healing. Stats that modify throughput are Spellpower, Crit, and Haste, while sustainability is affected by MP5 and Intellect. Spirit is primarily a sustainability stat but it has significant throughput effects too, through Improved Tree of Life. (I'm not forgetting about the crit from Intellect, but it's a smaller effect on a less-important stat.)

Triage

This isn't some WoW term — it's a medical concept with a history dating back to the Napoleonic Wars.
Triage (pronounced /ˈtriːɑːʒ/) is a process of prioritizing patients based on the severity of their condition. This facilitates the ability to treat as many patients as possible when resources are insufficient for all to be treated immediately. (from Wikipedia)
There's a lot of complexity to true triage, but the most basic form relies on three categories for your patients: (Quoting again from Wikipedia)
1. Those who are likely to live, regardless of what care they receive;
2. Those who are likely to die, regardless of what care they receive;
3. Those for whom immediate care might make a positive difference in outcome.
The word "triage" comes from a French word that means "to sort", but I've always been struck by the "tri = three" resemblance.

For healers in WoW, this means understanding your priorities. Sometimes, if a DPS toon pulls aggro, you may not have enough healing power to save them. Sending heals onto that toon burns GCDs and mana that ends up wasted. Triage also means knowing who can wait because they're not in immediate danger.

Triage also involves knowing who you can afford to let die. Hint: the tank usually can't afford to die. It also can involve choosing among your DPS. Who's the damage leader and who's not quite up to par? Keeping the right one alive can make the difference between winning the fight and dying to an Enrage timer.

A related concept is healing assignment. As you get into 10- and 25-man raids, you'll be working with other healers. Assignments are basically there to help the healers avoid stepping on each other's toes. Again, this is all about resource management. If two healers are fighting to heal the same toon, there's probably another toon that's dying in the meantime.

Summary

The base concepts I talked about here are really what
  • You have a limited number of spells you can cast. Managing your GCD is all about choosing the right spell and target with those casts.
  • You can only heal while you have mana. Mana management is a bit avoidable at the moment, but it's going to get more important with patch 3.1. Sometimes, however, mana concerns have to take a back seat to just keeping people alive.
  • Your gear represents a hard limit on how much healing you can do.
  • Sometimes, deciding who lives and who dies is part of being a healer. That's triage.
OK, that's my throat-clearing first post. Next time out I'll look at tank healing.

03 February 2009

Resto gear weights, revisited

I wrote a post last week with stat weights for both trees and Moonkin. Today I wanted to go into the qualitative reasoning behind the numbers.

Here were the weights I had for Resto:

Resto weights:
MP5: 10.0
Spellpower: 9.4
Intellect: 5.8
Spirit: 5.1
Haste: 2.9
Crit: 2.0
Socket-Red: 180.0
Socket-Yel: 130.0
Socket-Blue: 110.0
Socket-Meta: 320.0
I'll look at primary, secondary, and tertiary stats. I'll skip the gems today, but in essence they're based on looking at stat values for the best blue-quality gems of a given color.

Primary Stats: MP5 and Spellpower

It is just about impossible to overstate the importance of Spellpower (SP). It is the fastest way to increase the size of your heals. This benefits you in all kinds of ways. Beyond having more powerful heals, you'll also have to cast fewer heals, which will save your mana. Spellpower always has been and always will be a key stat for any caster class. There will never come a time when you say "No thanks, I've got enough."

Mana per 5 sec (MP5) provides the opposite side of the equation — more mana. Specifically, it boosts your mana recovery rate. This works on both sides of the 5 second rule (5SR), but its most important when you're casting.

The value of MP5 is much less clear-cut than Spellpower. If you're not running out of mana, you have either enough or too much MP5. As mana regen isn't really a problem for many players, you'll see statements that "MP5 is overvalued". If two items are otherwise similar, but one has MP5 while the other has more SP, most players will prefer the SP item.

When you're evaluating gear with MP5, consider whether you ever go OOM. Don't think about the easy stuff you do; think about when you're really working. (You want to gear for the most challenging situations, right?) If your mana bar is mostly full, give MP5 a lower weight. But don't drop it entirely; you never know when new content will start drinking your mana again.

And also, be prepared for this to change; the developers have clearly stated that they want to look at mana regen. No info yet on whether this will be a tweaking of the numbers, or a complete change to the way the stats work.

Secondary stats: Intellect and Spirit

I only call these 'secondary stats' because they're weighted about half of SP and MP5. But Spirit and Intellect are important.

Intellect (Int) does a few related things for you:
  • Increases your mana pool
  • Improves your mana regeneration
  • Increases your spell crit chance
Our main concerns are the mana implications. A bigger mana pool is helpful in a lot of ways. The 'mandatory' raid buff Replenishment returns a percentage of your maximum mana, so a bigger pool works well with this.

Intellect is also key for Moonkin who have the Lunar Guidance and Dreamstate talents. But we're talking Resto here!

Spirit (Spi) is primarily about mana regen. By default it affects your MP5 only when you're out of the 5SR, but Intensity allows 30% of that to carry over while you're casting too. Spirit directly affects this regen ability, but it's also modified by the square root of Intellect. So Spirit has a much stronger effect on mana regen, but since Intellect also increase your mana pool, it has overall the bigger impact.

Your regen outside the 5SR is also important because of Innervate. Pure MP5 has no effect on Innervate; it's based completely on your Spirit-based regen. A common rule of thumb is that "you need enough spirit to regen a full mana bar within one Innervate." That's a good target but it's neither a firm requirement nor a hard cap on Spirit.

Spirit also affects your Spellpower via the Improved Tree of Life talent. It's a 5/10/15% effect, so 100 Spi adds 15 SP if you have the talent maxed out.

So you'll want both Int and Spi. As it happens, Intellect is found on more pieces of gear, so you'll probably wind up with a good amount without trying. Spirit is less common, so keep an eye for items that have a good bit of spirit on them. If you're close to a 50/50 weight between the two, you're probably in good shape.

Tertiary Stats: Haste and Crit


In the abstract, these are good stats. Crit rating increases your chance for a spell crit, while Haste rating reduces cast times and reduces your GCD. Both these stats used to have spell-specific versions, but in current WoW they are shared with their melee counterparts.

But both are a bit problematic for Resto druids, for various reasons.

Haste has two significant challenges. For one, our most important spells are instant cast, and see no direct benefit from haste. Regrowth, Nourish, and Healing Touch are all affected, but these are not really staples of the healing rotation.

On the other hand, the GCD reduction is nice. The problem here for Resto is Gift of the Earthmother. It already reduces your GCD by 30%, so you have quite a head start. That puts your GCD at 1.05s, but the GCD can't go below 1s. (Edit: With patch 3.0.8, GotEM now reduces your GCD to a flat 1.2s max.) Phaelia did a complete analysis of the relationship. But the upshot is that your GCD is already pretty fast, and so haste is OK but not crucial.

Crit suffers from the same problem: our best spells don't use it, and our talents make it a bit redundant. Our HoTs don't crit, which removes most of the value of crit right away. You won't cast Nourish or Healing Touch all that often, and you will mostly not let Lifebloom bloom, so you just won't get many crit chances from these spells.

The exception is Regrowth; that's used fairly frequently and crits are quite useful. But here we have Improved Regrowth, giving Regrowth a 50% increased chance to crit. So here Crit is just going to have less impact. A change from 15% to 16% crit is a big improvement; you'll crit about 7% more frequently. But going from 55% to 56% is hardly noticeable — only a 2% increase in crit frequency.

Crit is still useful, mostly for your NS+HT combo and for when you want Lifebloom to expire. But, like haste, you'll never feel like it's a stat that you're actively trying to stack. My experience is that you'll have plenty of both without searching it out. Treat it as a tiebreaker between otherwise similar pieces of gear, with Haste just a bit more important than Crit.

Other stats

The other stats you will consider are defensive stats: armor, Stamina, and resilience. These are crucial for PvP, but for PvE instances they're generally not worth sweating over.

Stamina is probably the most important, as you're sure to take random damage at some point. But most gear carries Stamina anyway so you're not likely to go searching for it.

Armor only matters if you're getting whacked by something. So if all's going smoothly, it should be irrelevant. This is why you should feel OK about wearing some cloth gear, when it's available. (Don't take too many rolls from your priest, mage or warlock friends — they need gear too!) Resilience is even less important for PvE, but it will help a bit.

You will see some caster gear with Hit rating on it. This does absolutely nothing for a healer, but you'll see some good caster gear with hit on it. This is designed for Moonkin (or Mages or Warlocks if it's cloth). Leave it for the DPS casters if they need it, but if not, the gear may still be useful to you despite the irrelevant hit rating.

Otherwise there really aren't any stats that a Resto druid will care about. Spellpower and MP5; Intellect and Spirit; Haste and Crit.

27 January 2009

Evaluating Druid Gear - weights for Moonkin and Trees

I wrote up an earlier post on ranking resto and balance gear. I want to talk about the tools I use to rank gear, and also the specific numbers I use for those rankings.

Ranking tools

Easy: Wowhead and Lootrank
The easiest ranking tool is Wowhead. In fact, it's built in. I wrote a whole post on ranking items in Wowhead. Here for example is the list of leather helms ranked by Resto value. I do not agree with the default Wowhead rankings -- they vastly overvalue MP5 and Spirit relative to the other stats. (More on the values in a moment.) But you can edit in your own values — click on Show Details and then enter the values you'd rather use.

The alternative is to use Lootrank. It's similar to Wowhead, but gives you somewhat better filtering options, and the capability to save your weights. I use a combination of both tools.

Detailed: Spreadsheet
The most detailed way to rank gear is with a spreadsheet. You can put items into it and do the math based on your weights to rank the various items. Here's a sample from my spreadsheet, showing the ranks I put on helms:


The spreadsheet is great because you can cut out extraneous items, only listing what you want to see. But it's a lot of work; you'll end up copying data from Wowhead. I do it anyway because I can print out a copy and keep it next to my computer. It's especially great for tracking what BoH items I want to buy, or what Heroic to run for any needed upgrades.

In-game: Pawn
The best way to evaluate gear in-game is the Pawn addon. It will show your relative values directly in item tooltips. This is hugely valuable when gear drops. You can look at what you have and what dropped, compare the two numbers, and get a quick gauge of whether something is an upgrade or not. I definitely recommend using a bit of sense with this too; for example, if the upgrade is minimal, it's probably not worth the expense of adding new enchants and gems. Still, Pawn definitely makes your gear choices easier.

Ranking weights

OK, so those are the tools you use. What are the weights you should use?

I wrote a whole post about this early in WotLK, which took a very rough look at gear evaluation. I've been using that basic approach, but with more refined values.

Resto (Tree) stat weights
For resto I'm still using the weights I ninja'd from this EJ post. I rounded those a bit, and did some adjusting for the gem values, giving me the following:
Resto weights:
MP5: 10.0
Spellpower: 9.4
Intellect: 5.8
Spirit: 5.1
Haste: 2.9
Crit: 2.0
Socket-Red: 180.0
Socket-Yel: 130.0
Socket-Blue: 110.0
Socket-Meta: 320.0
Pawn string:
( Pawn: v1: "Resto PvE": Intellect=5.8, RedSocket=180.0, CritRating=2.0, ColorlessSocket=180.0, MetaSocket=320.0, HasteRating=2.9, BlueSocket=110.0, YellowSocket=130.0, SpellPower=9.4, Spirit=5.1, Mp5=10 )

Balance (Moonkin) stat weights:
I did a bit more research here — mostly because I didn't like the Moonkin values I saw in the EJ thread.

With all specs your weights should really change as your gear changes. That's even more important with a stat like Hit: it's very important until you reach the cap, but after that it's not very valuable. So for Balance I took my values from Rawr. (I would have done the same thing for Resto, but Rawr doesn't give you stat values in its Tree model. Shame, that.)

These values should be good at low to moderate gear levels, but as you get maxxed out your values will change. In particular, you'll weight Hit much less once you reach the cap.
Balance weights:
Spellpower: 12.1
Hit: 11.3
MP5: 10.0
Crit: 6.3
Haste: 5.7
Intellect: 3.8
Spirit: 1.5
Socket-Red: 230.0
Socket-Yel: 140.0
Socket-Blue: 140.0
Socket-Meta: 360.0
Pawn string:
( Pawn: v1: "Balance PvE": Intellect=3.8, RedSocket=230.0, CritRating=6.3, ColorlessSocket=230.0, MetaSocket=360.0, HasteRating=5.7, BlueSocket=140.0, YellowSocket=140.0, SpellPower=12.1, Spirit=1.5, Mp5=10, HitRating=11.3 )

Those numbers should get you started. Use them in Wowhead or Lootrank, in your spreadsheets, or in Pawn. And don't be afraid to change them — if you're going OOM a lot, rank Spirit and MP5 higher, for example.

Still to do: create values for PvP. I have no numbers, but I can provide hints for what I'd look at. PvP weights will add value for Resilience, Armor, and Stamina, but you'll need to decide the weights for survivability vs. damage. And it also adds value for stats like Spell Penetration, and will probably lean towards more bursty stats like Crit.