Druid healing on Loatheb
Sorry for the lack of posts this week. I'm working on a "Druid Healing Rotation" omnibus, but it's going to take a few days.
Our guild had another successful night last night. This is our first week with multiple runs into Naxxramas. Our first night saw us close out the Spider wing and kill Noth, all of which we'd done before. Last night was new territory for us, as we got three guild firsts: Heigan, Loatheb, and Razuvious.
As a healer, Loatheb is the most interesting boss — by design. (Doubt me? "Loatheb" is an anagram for "Healbot"!) Loatheb casts a wicked debuff called Necrotic Aura. He casts it every 20 seconds, and it prevents all healing for 17 seconds. All healing! That means no spells, no potions, no bandages, no Improved Leader of the Pack... nothing. For 17 seconds, your health bar goes only to the left.
What makes this really interesting for healers is that you can cast heals — they just don't do anything outside the 3-second window. That leads to some very tactical healing to get the most healing into the shortest time. You have to be very aware of the mechanics of your spells. Cast times, GCD, HoT durations, and HoT ticks are all very important. All this will vary, mostly based on your talents, glyphs, and the Haste you have on your gear.
Healing this encounter is all about timing the window. I recommend (again) that you install Deadly Boss Mods. It will track the Necrotic Aura and give you a timer for when the healing window will open. Watch that, and you can time your spells closely.
But what spells should you cast? The key is what I call the Bloom Window.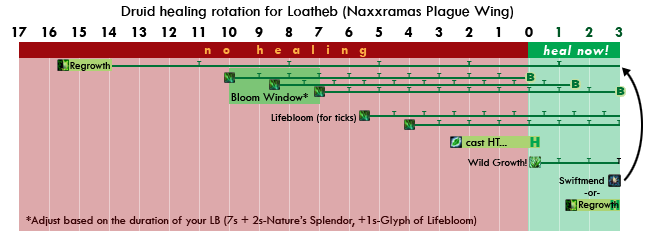
Let's start at the beginning of a Necrotic Aura cycle. This is your down time. For the first 7-10 seconds of the aura, you don't have much to do. Cast a Regrowth, or two if you're really sweating. It's the only HoT that will last long enough to tick during the healing window. You will probably also use this HoT for Swiftmend fodder in a bit.
Now we come up on the Bloom Window. The goal here is to get Lifebloom to expire and "bloom" during the healing window. So you will cast three Lifeblooms on different targets during the Bloom Window. Those 3 casts will realistically take between 2.5 and 3 seconds*, so you'll get 3 Lifeblooms to Bloom during the healing window.
So when is this 3-second Bloom Window? This depends on the duration of your Lifebloom, which starts at 7 seconds, but extends 2 seconds if you take a point in Nature's Splendor, and 1 second if you use the Glyph of Lifebloom.So here's your window:
Baseline -7s to -4sSo cast your three Lifeblooms on three different targets during the Lifebloom window. This will do a good chunk of your healing overall.
Glyph -8s to -5s
Talent -9s to -6s
Glyph + Talent -10s to -7s
Now you'll have a few seconds before the healing window. Your best use of the time is to cast more Lifeblooms on different targets. (Remember, you want those earlier LBs to expire at just the right time, so don't stack on them.) With these Lifeblooms, you'll use the 3 ticks during the healing window to provide some extra health. With these Lifeblooms, since you don't care when they expire, you can either cast them on different targets or stack them on the tank or another toon in danger.
Now we're coming to the healing window. The main thing you're shooting for is a Healing Touch to land just as the window opens. HT cast time starts at 3 sec, goes to 2.5 seconds with 5/5 in Naturalist, and will be further cut by Haste on your gear. Having it land a hair late is OK, while a hair early is no help. So err on the side of starting a bit late.
Follow your HT with an instant Wild Growth. That will get you two ticks of WG during the window, on 5 players. Since there's a range factor, keep in mind whether you're hitting the melee/tank zone or the caster zone. But either way, get that WG in there!
Now you have, realistically, one cast left. Your best bet is probably a Swiftmend on one of the Regrowths you left ticking from the start of the cycle. You could also use a Nourish here, but Swiftmend will probably be your better bet.
Alternatively, you could use your Nature's Swiftness plus Healing Touch, but you'll only get one of those every 3 minutes.
If you have GotEM and a lot of haste, you might have just enough time to get a Regrowth off. It's your biggest heal option here, but you'll need a lot of haste and a lot of luck to fit it in. Today you might cast another Wild Growth, but with patch 3.0.8 it will see a cooldown that will prevent this. Better get used to living with that now.
So here's the summary:
-17s Rest and recover manaThis fight will really test your healing smarts, rather than your sheer HPS. It's a true challenge — enjoy it!
-15s Regrowth (for ticks)
-10s* 3 Lifeblooms, different targets, as fast as possible
-7s* A couple more Lifeblooms (on more new targets) depending on how much time you have left.
-2.5s Begin casting Healing Touch
0s HT lands. Cast Wild Growth.
1.3s Begin casting Swiftmend, Nourish, NS+HT, or alternatives
*Depending on where your Bloom Window lands, based on the Natural Perfection talent and the Glyph of Regrowth.
*If you have so much Haste gear that your GCD is 1 second, I'm sure you are so well geared that you don't need my advice!
![]()
1 comment:
Informative post on making what I'm finding a very boring boss fight to heal as a resto druid. Ive taken to helping dpsing if we have 3 healers . But, last loatheb fight I played about with this and found that I may make a couple of changes based upon time in the fight, relative strength of the other healer(s) and the benefit of having Nature's Splendor has casting Rejuve instead of regrowth if using it for ticks not the initial heal.
Having Nature's Splendor means that a rejuve lasts 18 seconds which is easily enough to last from when you might cast your first regrowth (for ticks), its cheaper, you waste less heal, can get off 2 in the time it takes to cast regrowth and the heal of the tick is about 1.8 times that of the regrowth tick. This and wild growth is just about all I use near the start of the fight.
As you get further into the fight (more dooms) I often build up a 3 stack of lifebloom on low health targets so I get 2 ticks and a bloom in the healing window (means you cast the last LB just before 7s) bearing in mind that you can set the first two cast up before hand and don't need to chain cast on the main target at this point so you can get a LB ready to bloom on 2 other targets and not miss the 7s window for the ticks and bloom on your main target.
And healing after the bloom window I would also point out that you will get more healing again from a rejuve tick than you will from 3 ticks of a 1 stack LB and about the same as 3 ticks of a 2 stack LB the benefit of rejuve here is its cheaper than a 2 stack of LB and you can Swiftmend it meaning you have more options for who to heal in the last part of the heal window. If you plan on rolling a 3 stack of LB on a player (tank maybe) this is the most healing you can get in the healing window from a hot ticking though the bloom is about the same as 3 ticks of a 3 stack. Casting Healing touch or regrowth last thing before the healing window is absolutely the right thing to do based upon your preference and talent spec as improved regrowth has a silly crit rate. Regrowth is better than a glyphed healing touch but a normal healing touch has a higher possible heal.
Last thing as its close to 3.1 come the new patch LB is more expensive to cast but you get the mana back when it blooms and its bloom is multiplied by the amount of stacks meaning currently I do over 3k healing on a bloom and over 1k on a tick this would jump to 9k (correct this if I'm wrong but thats what I surmise from the ptr notes) so a 2 tick and a bloom of a 3 stack would give you (me) over 11k healing in that window (its closer to 13k with my current +healing) I dont think any other spell can get that much healing in that window on a target unless you get 2 regrowths/healing touch off on the same target that both crit, but then thats all you have done and with the lifebloom route I can heal someone else for the majority of the time.
Post a Comment